Tuesday, 28 November 2017
ASPMVC , WebService , WCF Tutorial : Sending Emails In ASP.NET MVC From Controller Usin...
ASPMVC , WebService , WCF Tutorial : Sending Emails In ASP.NET MVC From Controller Usin...: Sending Emails In ASP.NET MVC From Controller Using WebMail Helper Email communication is very important in today's modern applicati...
SENDING EMAILS IN ASP.NET MVC With Attachment
SENDING EMAILS IN ASP.NET MVC With Attachments
In my previous article on Sending Emails In ASP.NET MVC with Web Mail , we have learned how to send emails from View using WebMail Class , Now in this article we will learn how to send emails in ASP.NET MVC from controller with Attachments. So let's learn step by step so beginners can also learn how to send emails in with Attachments ASP.NET MVC from controller.
- Active internet connection.
- Email id of any provider such as Gmail, Yahoo or your organization to send emails.
- "Start", then "All Programs" and select "Microsoft Visual Studio 2015".
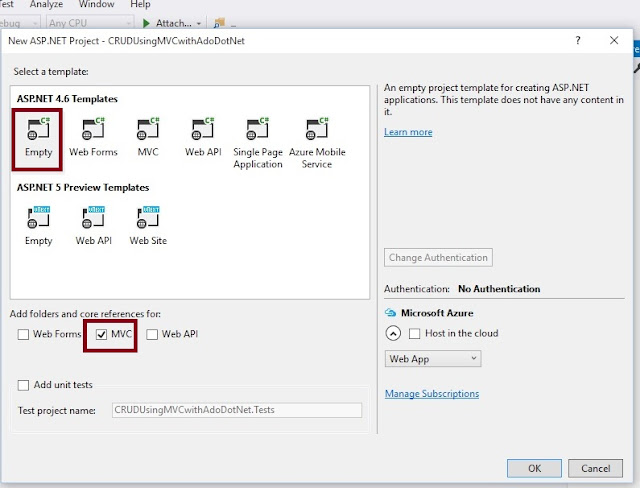
- "File", then "New" and click "Project", then select "ASP.NET Web Application Template", then provide the Project a name as you wish and click OK. After clicking, the following window will appear:
Prerequisites
Now let's create a simple MVC application to demonstrate this.
Step 1: Create an MVC Application.
Now let us start with a step by step approach from the creation of a simple MVC application as in the following:
- public class MailModel {
- public string From {
- get;
- set;
- }
- public string To {
- get;
- set;
- }
- public string Subject {
- get;
- set;
- }
- public string Body {
- get;
- set;
- }
- }
- using System;using System.Collections.Generic;using System.IO;using System.Linq;using System.Net;using System.Net.Mail;using System.Web;using System.Web.Mvc;namespace SendMailwithAttachment.Controllers{public class SendMailerController : Controller{public ActionResult Index(){return View();}[HttpPost]public ActionResult Index(SendMailwithAttachment.Models.MailModel objModelMail, HttpPostedFileBasefileUploader){if (ModelState.IsValid){string from = "Your Gmail Id";using (MailMessage mail = new MailMessage(from, objModelMail.To)){mail.Subject = objModelMail.Subject;mail.Body = objModelMail.Body;if (fileUploader != null){string fileName = Path.GetFileName(fileUploader.FileName);mail.Attachments.Add(new Attachment(fileUploader.InputStream, fileName));}mail.IsBodyHtml = false;SmtpClient smtp = new SmtpClient();smtp.Host = "smtp.gmail.com";smtp.EnableSsl = true;NetworkCredential networkCredential = new NetworkCredential(from, "Your Gmail Password");smtp.UseDefaultCredentials = true;smtp.Credentials = networkCredential;smtp.Port = 587;smtp.Send(mail);ViewBag.Message = "Sent";return View("Index", objModelMail);}}else{return View();}}}}
- @model SendMailwithAttachment.Models.MailModel@{ViewBag.Title = "Index";}<script src="~/Scripts/jquery-1.7.1.min.js"></script><script>$(document).ready(function () {if ('@ViewBag.Message' == 'Sent') {alert('Mail has been sent successfully');}});</script><h2>Index</h2><fieldset><legend>Send Email</legend>@using (@Html.BeginForm("Index", "SendMailer", FormMethod.Post, new { @id = "form1", @enctype ="multipart/form-data" })){@Html.ValidationSummary()<input type="submit" value="Send" /><table><tr><td>To:</td>@Html.TextBoxFor(m => m.To)</td></tr><tr><td>Subject:</td><td>@Html.TextBoxFor(m => m.Subject)</td></tr><tr><td>Attachment</td><td><input type="file" name="fileUploader" /></td></tr><tr><td>Body:</td><td>@Html.TextAreaFor(m => m.Body)</td></tr></table>}</fieldset>
3. As shown in the preceding screenshot, click on Empty template and check MVC option, then click OK. This will create an empty MVC web application whose Solution Explorer will look like the following:
Step 2: Create Model Class.
Now let us create the model class named MailModel.cs by right clicking on model folder as in the following screenshot:
Note:
It is not mandatory that Model class should be in Model folder, it is just for better readability you can create this class anywhere in the solution explorer. This can be done by creating different folder names or without folder name or in a separate class library.
MailModel.cs class code snippet:
MailModel.cs
Step 2
Create a New SendMailerController in the Controller folder. let us add the MVC 5 controller as in the following screenshot:
The following is the code for the design of the new Controller.
HomeController.cs
Step 4 :
Create view named Index.
Right click on View folder of created application and choose add view . As shown in the following image,
Now open the Index.cshtml view , and Write the following Code
Index.cshtml
Now we have done all coding to send emails using WebMail class.
Step 5 : Now run the application.
Subscribe to:
Comments (Atom)


